Default Router Login Settings att: A Step-by-Step Guide
Accessing your router's settings is a crucial part of maintaining a secure and efficient home network. In this article, we'll delve into the world of Default Router Login Settings att, providing you with a comprehensive guide on how to access your router, change network settings, troubleshoot connectivity issues, and more.
The Default Router Login Settings att refer to the username and password you need to login to your router's dashboard. This information can be found on the router's label or product packaging, but sometimes it may be different from the default settings.
Step 1: Connect to Your Router's Network
- Make sure your device is connected to your router's network, either via Wi-Fi or through a wired Ethernet connection.
- Ensure your device is set to obtain an IP address automatically.
Step 2: Open a Web Browser and Enter the Default IP Address
- Open a web browser on your device, such as Google Chrome or Mozilla Firefox.
- Enter the default IP address of your router, which is usually 192.168.1.1 or 192.168.0.1. You can find this information in your router's documentation or on the label.
Step 3: Enter the Default Login Credentials
- Once you've entered the IP address, you'll be prompted to enter your login credentials.
- The default login credentials for AT&T routers are admin/admin, but you may need to check your router's documentation or label for the correct information.
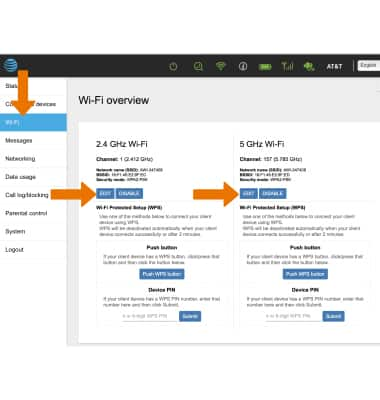
Change Your Wi-Fi Network Name and Password
Now that you've accessed your router's settings, you can change your Wi-Fi network name and password. This is a crucial step in securing your network and preventing unauthorized access.
- Go to the Wireless Settings section of your router's dashboard.
- Change the Network Name (SSID) to a unique and secure name.
- Change the Network Password to a strong and unique password.
Troubleshoot Connectivity Issues
Sometimes, connectivity issues can arise due to a variety of reasons, including incorrect IP settings, DNS issues, or conflicts with other devices on the network.
- Check your router's IP settings to ensure they are correct.
- Check your DNS settings to ensure they are correct.
- Restart your router to reset the network and resolve any conflicts.
Change Your Router Settings
Accessing your router's settings also allows you to change various settings to suit your needs.
- Change your router's IP address to a static address for better stability.
- Change your router's DNS settings to a local DNS server for better performance.
- Configure your router's firewall to allow or block certain types of traffic.
Reset Your Router to its Default Settings
If you need to reset your router to its default settings, you can do so by pressing the reset button on the back or bottom of the router.
- Locate the reset button on your router.
- Press and hold the reset button for 10-15 seconds.
- Release the reset button and allow the router to reboot.
Conclusion
Default Router Login Settings att are a crucial part of maintaining a secure and efficient home network. By following the steps outlined in this article, you can access your router's settings, change network settings, troubleshoot connectivity issues, and more. Remember to always check your router's documentation or label for the correct login credentials and IP address.
Popular AT&T Router Models with Their Login Details
Here are some popular AT&T router models with their login details:
- AT&T U-verse Gateway Router: 192.168.1.254, admin/admin
- AT&T BGW210-700 Arris Router: 192.168.1.254, admin/admin
- AT&T MF279 Wireless Internet Router: 192.168.1.1, admin/admin


 - Modem & Router Settings - AT&T")

 - Modem & Router Settings - AT&T")
 Device Help & How-To Guides - AT&T")
